
Mold testing Vancouver, WA
Mold Removal / Mold Remediation
Learn how mold can be safely and effectively removed with these tips.
Molds are fungi that live both outdoors and indoors. According to the Centers for Disease Control (CDC), there are as many as 300,000 different species of mold. Mold grows and reproduces quickly in damp, warm conditions. Mold can grow on almost any surface from insulation to paint.
Many species of mold are harmless, but others can cause serious health issues. An example is Stachybotrys chartarum, also known as black mold, which produces poisonous mycotoxins. Any kind of mold can be a grave issue for people who have underlying illnesses like asthma and allergies. Appropriate precautions are advised to avoid exposing yourself and your family to additional mold spores. When in doubt, seek professional assistance.
Although mold isn’t always a threat to one’s health, it can still cause structural damage to your home if it isn’t detected or treated. If you suspect that you have mold in your home — don’t wait. Address the problem immediately.
Mold Testing Portland, Oregon
Signs of Mold
There are a variety of different signs that can indicate a mold problem in your home.
A Damp, Musty Smell
Have you noticed a damp, musty smell in your home recently? This is a clear sign that you might have a mold problem. You should definitely investigate musty odors. Professional mold testing can help you to pinpoint the source.
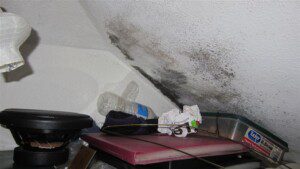
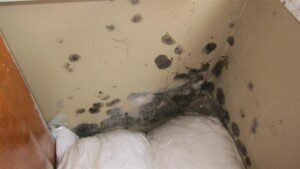
Visible Mold
If you see black mold on your walls, carpet or other surfaces, then you definitely have a mold problem. The downside is that at this point, you probably have a large amount of mold present in areas that are not easily seen. For example, if you see black mold on your carpet, you probably have it underneath in the padding and floor, as well.
Cracking Or Peeling Wallpaper
Mold can grow on wallpaper. Cracking, peeling or bubbling wallpaper can all be a sign of moisture or even mold growth in the walls. If the wallpaper feels damp to the touch, then you most likely have a serious moisture issue.
Respiratory Issues
If you or your family have been having frequent respiratory issues, it could be caused by mold. Worsening asthma can be a sign of mold. Cold-like symptoms that don’t go away is another. Do your symptoms go away when you leave your house for a couple of days? They could definitely be due to mold growth in the home.
If you have signs of mold present in your home, we recommend a professional mold inspection as soon as possible. Although some websites suggest that mold testing isn’t necessary if you can see or smell mold, we disagree. It’s worth it to hire a professional mold inspector.
Mold isn’t always visible to the eye. And, just because you can’t smell mold, doesn’t mean that it isn’t present. A mold inspection can help you locate hidden mold, identify the species of mold, the exposure level, and measure your indoor air quality. A professional MoldReport is packed with useful information that you need to do DIY mold remediation.
DIY Mold Remediation
Once you have mold testing completed and know that you have mold, you should take steps to stop the damage. In some cases, you can perform DIY mold remediation. If you take precautions, you can generally do DIY mold remediation if the mold covers only a small area (less than 10 square feet). Mold that is caused by raw sewage or flooding is not a DIY job.
Also, if you have asthma or another condition that could be exacerbated by mold removal, call in a pro for help. Still not sure whether or not you have a DIY job? Check out this video for more information.
Things You’ll Need For DIY Mold Remediation
You will need some basic tools and supplies before getting started with mold remediation. Make sure you have them handy.
- Plastic sheeting
- Trash bags
- Dehumidifier
- HEPA air scrubber
- Window fan
- Pump sprayer
- Box cutter or a utility knife
- Duct tape
- Wire scrubbing brush
- Dish soap
- Bucket
- Latex paint (mold-resistant)
- Oil-based primer
- Protective equipment (see below for specifics)
- Fungicide cleaning spray
- Bleach
- Disposable cleaning towels
Once you have all of the supplies, you are ready to get started. Here are the steps for safe mold removal.
#1 Find The Moisture Source
Before getting started with mold removal, you’ll need to find the source of moisture and fix the problem. Otherwise, the mold will just keep coming back. Look for nearby plumbing fixtures, waste lines, and water pipes. The source of the moisture could be quite a distance away from the actual mold. If you are not sure where the mold is coming from, it is a good idea to contact a professional home inspector to get down to the source of the mold.
#2 Take Precautions
Before getting started with DIY mold removal, make sure you take the proper precautions.
- Wear Proper Clothing. Wear clothing that you can discard or launder after the job is finished. We recommend coveralls and a long-sleeve shirt. Wear gloves to make sure you don’t spread mold spores from your hands to your eyes, nose or mouth.
- Use a respirator. A regular dust mask will not work when doing mold cleanup. Choose an N-95 or N-100 respirator that is approved by the National Institute for Occupational Safety and Health (NIOSH) for protection from mold particles.
- Seal off the area. Once you start cleaning mold, the spores will become airborne. They can then contaminate other areas of your home. So, make sure you seal off the room or area that you are working in. Tape plastic sheeting over the doorway and close the air vents and registers to the room. Also, turn off the HVAC system.
- Install a window fan to pull air from the room. Make sure the fan is pointing towards the outside.
#3 Remove The Mold
Start by cleaning mold from hard surfaces, such as wood trim, with soap and water. Since mold cannot be removed from porous surfaces like carpet and insulation, these things will have to be thrown away if they are moldy.
Carpets
Cut soiled carpet and carpet pad into medium-sized sections with a utility knife. Prevent mold spores from becoming airborne by spraying the sections with water using a pump sprayer. Next, wrap up the carpet in plastic and tape the sections. Dispose of the carpet.
Walls
If you have signs of mold in your wall, you’ll need to cut out the drywall. Before you cut out the drywall, make sure you cut the power to the outlets in the room. This will prevent you from accidentally cutting through live wires. Using a stud finder that senses electrical current is also a good idea to prevent damaging wiring in the walls.
Like carpet, drywall cannot typically be saved if it is wet and moldy. It will have to be removed and replaced. Since you will have to open up the wall to get to mold, cut the drywall back to find all of the mold. Spray the drywall with water using the pump sprayer and cut it out. Double-bag the drywall and seal the bag.
Insulation
When you remove and replace the drywall, look for signs of mold in the insulation. Remove and any moldy insulation and spray it with water. Throw the insulation in a trash bag and seal it.
#4 Clean Moldy Surfaces
After you have removed moldy carpets, insulation and walls, treat the remaining wood surfaces with a fungicide cleaning solution. If the studs or wall sheathing seems soft or springy, it is a good idea to replace rather than clean them. As long as they are solid, use a mixture of ½ cup bleach to one quart of water to clean surfaces. Use a soft brush and scrub until any remaining mold is gone. Then, allow the entire area to dry.
#5 Run a Dehumidifier and Air Scrubber
After you have completed the above steps, you’ll need to completely dry the area. There are two pieces of equipment that can help you achieve this goal —— an air scrubber and a dehumidifier. An air scrubber removes mold particles from the air while a dehumidifier removes moisture.
You can rent these machines from your local hardware store if you do not already own them. Simply place them close to the affected area and let them run continuously for three days.
#6 Treat The Area
Once you have dried the area thoroughly and run a filtration system, spray surfaces with an antimicrobial mold removal product. These cleaners destroy mold spores at the roots and leave behind an antimicrobial barrier to keep mold from coming back.
#7 Paint The Walls
After the area has completely dried, seal wood surfaces with an oil-based primer. Prep walls with a mold-resistant primer. Follow-up with latex paint that is specially formulated to resist moisture and mold.
#8 Dispose of Materials
After you’re done with mold remediation, you’ll need to properly dispose of the moldy materials. Make sure everything is double-bagged and sealed tightly. Then, you can throw away the bags with the rest of your trash.
#9 Schedule a Mold Inspection
The final step is to schedule a mold inspection to ensure that the area was properly cleaned and that all of the mold has been completely eliminated.
For more DIY tips and tricks, check out our blog. To schedule mold testing or home inspection services in Oregon or Washington, contact us. Our home inspectors are certified by the International Association of Certified Indoor Air Consultants to conduct mold testing.