You could save thousands by installing your own radon mitigation system. Here is a guide to help you get started.
This gas is the leading cause of lung cancer outside of cigarette smoking — and you might not even know that it is present until it is too late. What are we talking about? Radon is the gas in question. It is a tasteless, odorless radioactive gas that naturally occurs in the soil. Radon gas enters homes and buildings through cracks in the floor, foundation, basement, and other areas. Once it enters, radon will accumulate in your home. The problem is that you won’t know it’s there — unless you test for radon.
Most people are completely unaware of the danger that radon gas poses. Former Olympic athlete, 33-year-old Rachael Malmberg certainly didn’t realize it was present in her childhood home until she developed stage 4 lung cancer that spread to her brain. Malmberg told Health.comthat she conducted research after her diagnosis to determine the cause of her cancer. That is when she came across the information about radon. She tested her home and certainly enough, radon gas levels in her childhood house were high. Malmberg has since installed a radon mitigation system. Fortunately, she is also now in remission from cancer.
DIY Radon Mitigation
The Environmental Protection Agency (EPA) recommends mitigation if the level of radon in your home is above 4pCi/L. It is still a good idea to reduce the level of your home if the level is less than this, as lower levels still pose a risk, says the EPA.
Radon Testing
So, how do you know the levels of radon in your home? Since radon is odorless and tasteless, you’ll need radon testing to figure out whether or not you have high levels of the gas. If you live in our service area in Oregon or Washington, you could qualify for a FREE radon testing kit. Check out this link for more information.
Is Radon Mitigation a DIY Project?
Can you do radon mitigation yourself? The EPA recommends hiring a professional radon mitigation contractor because it takes specific knowledge and equipment to perform radon gas mitigation. If you do it wrong, you could actually increase the level of radon in your home. However, it is possible to do the work yourself if you have the appropriate information and expertise. To determine if you have the skills and knowledge to take on this project, ask yourself these questions.
Are you comfortable cutting holes through floors and foundation?
Do own or have access to a rotary hammer drill or a demolition hammer?
Do you know how to cut, fit and glue PVC or ABS pipe?
Are you capable of wiring an attic fan connection?
Are you able to excavate at least five gallons of soil through a five-inch hole?
Are you comfortable using solvent-based caulk to seal work?
If the answer is yes, then you might be able to perform radon mitigation yourself. If you answered “no” to any of the above questions, we recommend a professional radon mitigation company. Hiring a pro is also recommended if:
You have an older concrete block wall foundation. These usually have unsealed block tops or cores.
Your ductwork has either asbestos or material containing asbestos covering it.
There is heating or air conditioning ductwork running under your slab.
If you’ve reviewed the following and are confident that you are prepared to tackle this job, that is great news. According to Family Handyman, you can save yourself around $1,000 if you install your own radon reduction system. We’ve developed this helpful DIY radon mitigation guide to help you accomplish this task.
Radon Mitigation Overview
There are several different types of radon mitigation systems. The exact radon mitigation system that you will need will depend on your foundation design.
In this guide, we will be going over how to build an “active sub-slab depressurization” radon system. Active suction radon mitigation systems are ideal for homes built on a concrete slab or have a basement with a slab floor. If you have a crawl space with a dirt floor, you should investigation another method. For more information about the different types of radon mitigation systems, see this radon reduction guide from the EPA.
An active sub-slab depressurization system helps remove radon from the ground beneath your home. There are two ways you can install an active sub-slab depressurization system.
Through home / attic – You simply run the pipe outside through the home up to the attic and roof. With this type of installation, you’ll need to install a fan in the attic to suck the radon through the pipe and expel it to the exterior above the roof line.
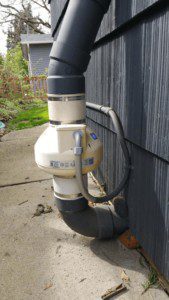
Directly outside – An alternative is to run the pipe on an outside wall. The fan will be attached the exterior of the home with the discharge pipe extending up the side of the home until it discharges above the roof line.
We’ll detail how to build a radon system that vents up and out through the roof. With this setup, you’ll run the PVC or ABS pipe from the foundation, into an attic and finally out the roof. You’ll also need to install a fan in the attic. The fan will create a suction in the pipe that draws air out of the soil located beneath your house. The air — and radon — will be pushed out through the roof.
If you decide to run the pipe from the foundation and through the outside of your home, that is fine too. When you get to Step 7, install the fan outside your home instead of going through the attic. If you choose this installation, keep in mind that you’ll need to exit through the rim joist.
Radon Mitigation System Installation
Here is a breakdown of the steps involved in building your own radon mitigation system. Before getting started, check out this video from Radon Specialists of WI, to see what a properly installed radon system looks like.
#1 Seal Cracks And Holes
The very first step is to seal holes and cracks in concrete walls and floors. This will help prevent gas from entering your home this way. Use caulk to fill tiny cracks. Seal larger gaps with hydraulic cement.
#2 Plan The Pipe
Mark the location for your PVC or ABS vent pipe hole on the basement floor. If you plan to install the pipe close to a basement wall, make sure you test a hole in the floor first to locate the foundation’s footing. If you drill into the footing, move the pipe a couple of inches further away from the wall.
#3 Drill A Hole For The PVC or ABS
Using a marker, draw a 6-inch circle where you plan to install the pipe. Make the circle a little bigger than the PVC or ABS pipe. This will allow to remove gravel and soil a lot easier and give you a bit of room to get the pipe installed. Use a rotary hammer to create several small holes to outline the marked area.
If you don’t have a large rotary hammer drill, you can use a 3/16-inch masonry bit to drill several small holes close together to make the outline. Then, use a demolition hammer to break through the center of the larger hole.
#4 Remove Dirt From Under The Hole
You’ll need to create a shallow pit directly below the hole. This is where radon will collect before it gets sucked up through the PVC or ABS. Use a drill with a soil-auger bit attached to pull up the dirt or whatever material is underneath your slab. Remove loose material with a shop vacuum. Plan on removing anywhere from five to 15 gallons of material depending on how tightly packed the soil. Keeping digging until the hole that is about 20-inches wide.
#5 Test The Fit
Before gluing all of the piping, do a “dry fit” to make sure everything fits. You want to ensure that everything fits together well before permanently gluing the piping. If the fit is good, you can then set and glue the pipe.
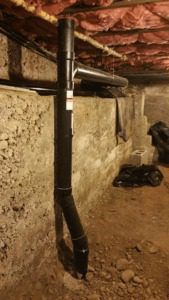
#5 Set The Pipe
The next step is setting the pipe. You’ll place it into the hole in the basement floor and through the walls.
Important Tip: If you are going through a garage, finished wall or ceiling, then you will need to also install firestop collars. These keep a fire from spreading through other areas of the house. Here is an example of a firestop collar. Install the barriers before setting the pipe.
#6 Seal The Hole
After you have installed all of the PVC or ABS piping, stuff a bit of foam-rubber backer rod completely around the base of the pipe. Backer rod is great for filling large gaps right before caulking. Just make sure the rod sits just below the concrete floor’s surface. Next, seal the pipe with fast-setting hydraulic cement. This type of cement expands to fill gaps, which helps make a tight seal. Take a trowel and shove the cement down until it is flush with the top of the concrete floor.
#7 Connect the Pipe to The Attic Fan
The next step is to install the fan in the attic. After you have set the PVC or ABS and sealed the hole, connect the pipe to a vent fan located in the attic. Make sure you add insulation around the pipe to minimize condensation and prevent mold. Use brackets to secure the pipe.
#8 Run The Pipe Through The Roof
After connecting the attic fan, run the pipe up through the roof. Make sure the pipe is vented as close to the ridge as possible. It should vent above the roof line and terminate at least 10 feet above the ground.
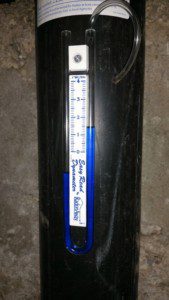
#9 Install A Monitor
Since radon mitigation systems can stop running, you’ll need something that alerts you when this happens. The easiest solution is to simply mount a liquid-filled manometer on the PVC or ABS pipe. When the liquid level drops, you’ll know the system isn’t working properly. A manometer does not test radon levels. So, you’ll need to do periodic radon tests. You can also purchase an electronic monitor that directly measures radon levels in the air.
#10 Do A Final Radon Test
Do another radon test after you finish installing your system. If you still have high levels of radon, you may need to install a more powerful fan. You can also try creating a second suction point where the pipe enters the floor. Sometimes this remedies the problem. If you try both of these issues and still have high radon levels, then it is time to call in a professional.
If you live in our service areas of Oregon and Washington and need radon testing or other home inspection services, please contact us or schedule a home inspection on our website.